
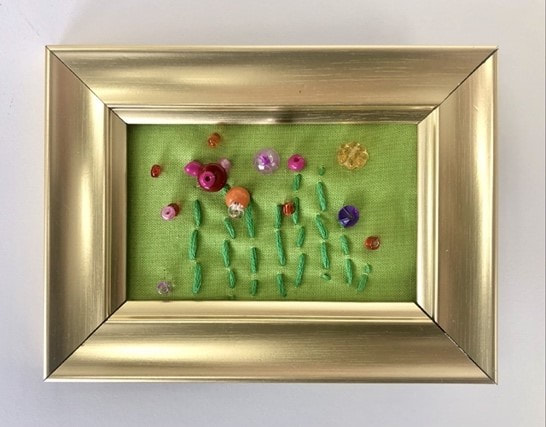
 This month’s Grab & Go project celebrates the upcoming spring season. Create your own lively fairy-garden scene using embroidery and beading techniques! The included frame and embroidery hoop provide a wonderful way to present your craft.
Supplies Provided
Supplies you have at home
Instructions: Step 1: Stretch the green fabric on the embroidery hoop. To do this, loosen the screw on the hoop, and remove the inner hoop. Place the inner hoop on a table and set the fabric on top of it. Then, fit the larger hoop onto the smaller hoop. The fabric should be stretched tightly between the two hoops. Tighten the screw. Step 2: Use the embroidery needle (the large needle) to stitch stems onto the fabric. Step 3: Use your beading needle (the smaller needle) to stitch beads around the top of the embroidered “stems.” Don’t forget to tie the loose threads together on the back of the fabric. Step 4: Display your garden! If you want to leave your craft in the embroidery hoop, you will only need to trim the excess fabric. If you want to frame your fairy garden, remove the embroidery hoop and place the embroidered fabric face down on a table. Next, remove the black frame backing and place it on top of the fabric. Be sure to center the backing over the design. Next, fold the edges around the backing. You may have to trim the fabric to make this easier. Use the black metal tabs on the frame to keep your fairy garden in the frame. Take pictures and email to info@theartbase.org or Kristen Doyle, kdoyle@basaltlibrary.org Jardines de Hadas: Bordado Con Cuentas El proyecto Grab & Go de este mes celebra la próxima temporada de primavera. ¡Crea tu propia y animada escena de jardín de hadas usando técnicas de bordado y abalorios! El marco y el aro de bordado incluidos brindan una manera maravillosa de presentar su artesanía. Suministros proporcionados
Suministros que tienes en casa
Instrucciones: Paso 1: Estira la tela verde en el aro de bordado. Para hacer eso, afloja el tornillo del aro y retira el aro interior. Coloca el aro interior sobre una mesa y pon la tela encima. Luego, encaja el aro más grande en el aro más pequeño. La tela debe estar bien estirada entre los dos aros. Ajusta el tornillo. Paso 2: Usa la aguja de bordar (la aguja grande) para coser tallos de puntada en la tela. Paso 3: Usa tu aguja para cuentas (la aguja más pequeña) para coser cuentas alrededor de la parte superior de los "tallos" bordados. No olvides atar los hilos sueltos en la parte posterior de la tela. Paso 4: ¡Exhibe tu jardín! Si deseas dejar tu artesanía en el bastidor de bordado, solo tendrás que recortar el exceso de tela. Si deseas enmarcar tu jardín de hadas, retira el aro de bordado y coloca la tela bordada boca abajo sobre una mesa. A continuación, retira el respaldo del marco negro y colócalo sobre la tela. Asegúrate de centrar el respaldo sobre el diseño. Luego, dobla los bordes alrededor del respaldo. Es posible que tengas que recortar la tela para que sea más fácil. Usa las pestañas de metal negro en el marco para mantener tu jardín de hadas en el marco. Toma fotografías y envíalas por correo electrónico a info@theartbase.org o Kristen Doyle, kdoyle@basaltlibrary.org
0 Comments
Your comment will be posted after it is approved.
Leave a Reply. |
Adult News & reviewsLibrary news, info about upcoming events, reviews of books and films, and a look at the topics that affect us as a library. Archives
July 2023
|
 RSS Feed

|
General |
Borrowing |
About |