• Programs & Events
    • Full Calendar
    • Music at the Library
  • Our Services
    • Adult Library (Books, DVDs, CDs)
    • Teen & Young Adult Library
    • Children's Library >
      • Dolly Parton's Imagination Library
      • Children's Resources
    • Biblioteca Española
    • Digital Media Library
    • Library of Things
    • Online Resources & Research Databases
    • Technology Help
  • En Español
  • Library & Community
    • Meet, Study, Work
    • Community Resources
    • Job Seeker Information
  • Support
  • Online Catalog
    • Search Online Catalog
    • Account Login
    • Renew Materials Online
Basalt Regional Library
  • Programs & Events
    • Full Calendar
    • Music at the Library
  • Our Services
    • Adult Library (Books, DVDs, CDs)
    • Teen & Young Adult Library
    • Children's Library >
      • Dolly Parton's Imagination Library
      • Children's Resources
    • Biblioteca Española
    • Digital Media Library
    • Library of Things
    • Online Resources & Research Databases
    • Technology Help
  • En Español
  • Library & Community
    • Meet, Study, Work
    • Community Resources
    • Job Seeker Information
  • Support
  • Online Catalog
    • Search Online Catalog
    • Account Login
    • Renew Materials Online

Grab & Go Activity: Beeswax Rolled Candles

12/18/2021

0 Comments

 
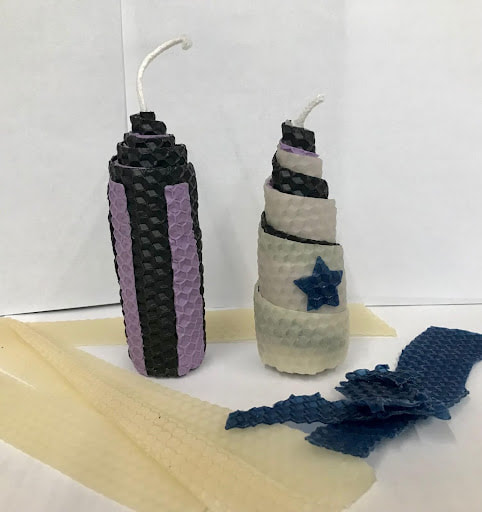
Create a candle using beeswax sheets and a wick.  Use the colored sheets to make shapes or designs to add to your candle and make it unique!  These are fun and creative gifts to give for the holidays!
Picture
Materials in your Grab & Go Kit:​
  • Two wicks
  • One large sheet of beeswax
  • One half sheet of beeswax
  • Various sheets of colored beeswax for decorating your candle
Materials from home:
  • Scissors or sharp knife
  • Pencil
  • Ruler
  • Hairdryer

Read More
0 Comments

Kids & Teens Grab & Go Activity: Japanese Side-Sewn Books

12/11/2021

0 Comments

 
Create your own sketchbook or journal with a Japanese side-sewn binding! Step-by-step instructions are below, but we recommend logging into CreativeBug with your library card number to watch their Japanese Side Sewn Sketchbook, or Kids Japanese Side Sewn Book tutorials. These videos will be especially helpful when it comes to threading your binding!

Materials Included in your Kit
  • 10 sheets of blank paper, 8.5 x 5.5”
  • 2 sheets of cover paper, 8.5 x 5.5”
  • 2 clothespins
  • Embroidery floss
  • Embroidery needle
  • Awl/bone folding tool
  • Bookbinding pattern​​

Picture

​Materials From Home
  • Scissors
  • Cutting matt, or another surface you don’t mind scuffing up
  • Optional: hole punch
Instructions

  1.  Stack your book together, with your blank paper sandwiched between your two cover papers. Once you have everything lined up and looking neat, use the clothespins to keep everything in place.
Picture
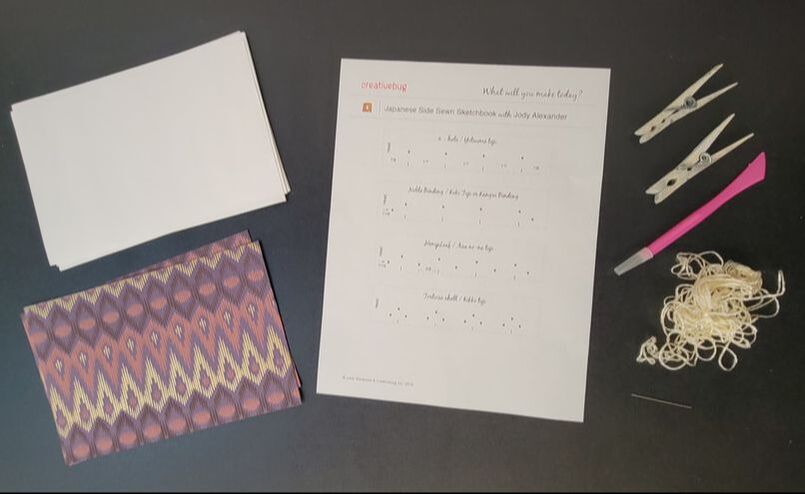
2. Cut out the 4-/hole/ Yotsume toji bookbinding pattern. Use the awl to poke holes through the dots on the pattern.
​

3. Place your bookbinding pattern on top of your front cover, lining up the edge of your template with the edge of your cover. Using a cutting matt, poke holes as indicated on the pattern through all your layers of paper. Making this project with younger kids? Use a hole punch to create holes for the binding instead of the awl - just stick to the pattern!
Picture
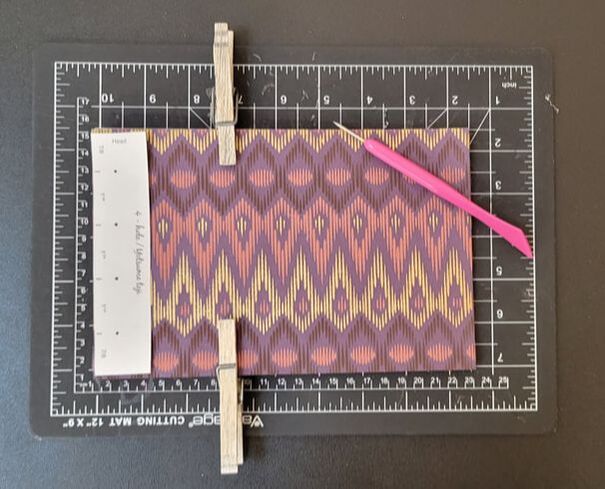
​4. Thread your needle with the provided string. Thread your string through the third hole from the top, leaving a 3” tail between the pages. Heading towards the top of the book, weave your needle and thread through each hole. Remember to go around the side edge of the book, and around the top and bottom edges as well, while having threaded between each adjacent hole, front and back. We recommend watching the video tutorials to see how this works - it’s not as hard as it sounds! You can skip ahead to this section by clicking “Binding” in the chapters section.
Picture
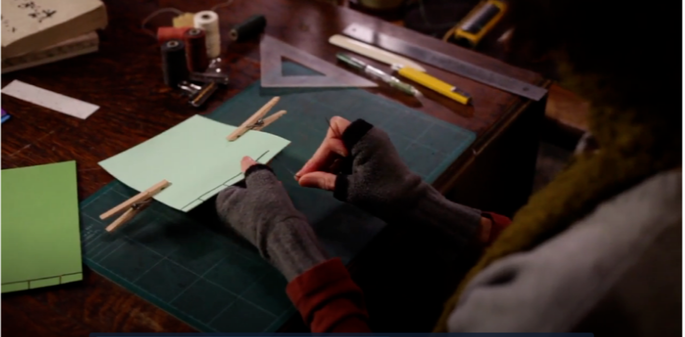
5. If bound correctly, your thread will end near the tail we started with. Tie this together with a small amount of slack and trim the ends to about half an inch. Tuck the small tail ends deeper into the binding, and your Japanese Side-Sewn Book is ready for sketching or writing!
Picture
Encuadernación Japonesa con cosido a los lados
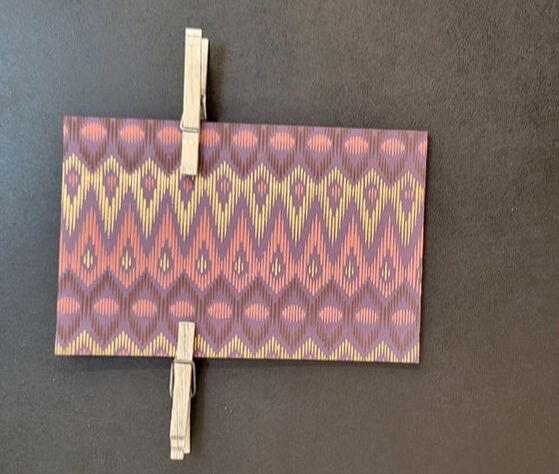
Proyecto de Arte para llevar a casa Niños y Adolescente


¡Crea tu propio cuaderno de bocetos o tu diario con una encuadernación japonesa con cosido a los lados! Las instrucciones paso a paso se encuentran a continuación, pero le recomendamos iniciar sesión en CreativeBug usando el número de su tarjeta de la biblioteca, donde encontrará tutoriales cómo:                                   Japanese Side Sewn Sketchbook 

Kids Japanese Side Sewn Book
​
¡Estos videos serán especialmente útiles cuando se trata de enhebrar su encuadernación!

Materiales incluidos en su kit
10 hojas de papel en blanco, 8.5 x 5.5 ”
​2 hojas de papel de portada, 8.5 x 5.5 ”
2 ganchos de ropa
Hilo de bordado
Aguja para bordar
Punzón

Materiales de casa
Tijeras
Cualquier superficie que sirva como base para cortar  (sufrirá cortes en su superficie)
Opcional: perforadora
Patrón de encuadernación para los agujeros.

Instrucciones
1. Apile las hojas de  papel en blanco y coloque los dos papeles de portada al comienzo y al final. Una vez que tenga todo alineado y luciendo ordenado, use los ganchos para  ropa para mantener todo en su lugar.

2. Recorte el patrón de encuadernación de 4 agujeros / Yotsume toji. Utilice el punzón para hacer agujeros a través de los puntos en el patrón.

3. Coloque su patrón de encuadernación en la parte superior de su portada, alineando el borde de su plantilla con el borde de su portada. Utilice la superficie que sirva como base para cortar y haga agujeros como se indica en el patrón a través de todas las capas de papel. ¿Estás haciendo este proyecto con niños más pequeños? Use una perforadora para crear agujeros para la unión en lugar del punzón, ¡solo manténgase en el patrón!
4. Enhebre su aguja con el hilo provisto. Pase su hilo a través del tercer agujero desde la parte superior, dejando una cola de 3 ”entre las páginas. Dirigiéndose hacia la parte superior del libro, entreteje la aguja y el hilo a través de cada agujero. Recuerde rodear el borde lateral del libro y también los bordes superior e inferior, mientras ha pasado entre cada orificio adyacente, por delante y por detrás. Recomendamos ver los tutoriales en vídeo para ver cómo funciona. Puede pasar a esta sección haciendo clic en "Encuadernación" en la sección de capítulos.

5. Si se encuaderna correctamente, su hilo terminará cerca de la cola con la que comenzamos. Ate esto junto con una pequeña cantidad de holgura y recorte los extremos a aproximadamente media pulgada. Introduzca los extremos pequeños dentro del encuadernado, ¡y tu libro japonés cosido a los lados estará listo para dibujar o escribir!
0 Comments

Proud Recipients of a Communities for Immunity grant!

12/9/2021

0 Comments

 
Picture
The Basalt Regional Library is pleased to announce it is a recipient of the Round Two Communities for Immunity grant, awarded to 50 museums,  libraries, and tribal organizations serving urban, suburban, and rural populations across 33 states.

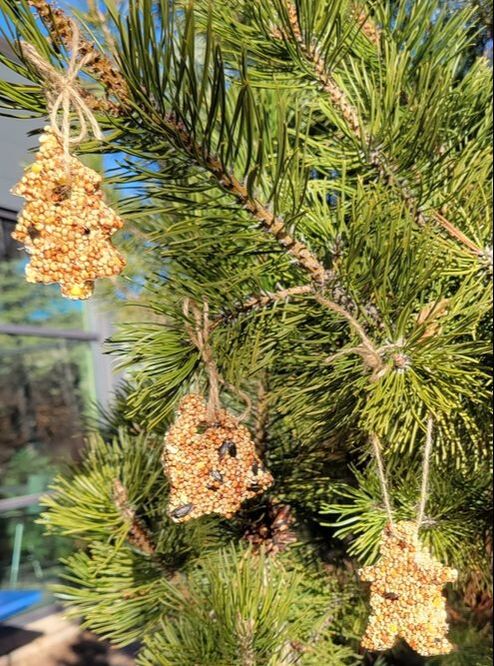
Supported by the Centers for Disease Control and Prevention (CDC) and the Institute of Museum and Library Services (IMLS), Communities for Immunity provides funding awards and support to museums and libraries engaging their communities to boost COVID-19 vaccine confidence. As trusted community partners, museums and libraries play a critical role in building vaccine confidence and fighting the pandemic.

The Basalt Regional Library will host public programs with local and regional medical professionals and scientists in conversations regarding the history of vaccines in the 20th century and their social and cultural impacts. The Library is also collaborating with the graphic novelist R Alan, creator of the Colorado Sun’s weekly strip “What I’d Miss”, to create a graphic essay on the importance of the current vaccine campaign. 
​

These programs will supplement the Library’s on-going vaccine clinics as part of Governor Polis’ “Vaccines for All” plan. 
“Through this unprecedented partnership, Communities for Immunity is providing nearly 100 museums, libraries, and tribal organizations across the country with over $1.6 million over two rounds of funding to help their community members make well-informed decisions about COVID-19 and vaccinations,” said Laura Lott, President and CEO of the American Alliance of Museums. “These organizations are linchpins in helping bring an end to the pandemic and leading their communities into a brighter, healthier future.”

Click here to learn more about Communities for Immunity.
0 Comments

Grab & Go Activity: Bird Feeder Ornaments

12/4/2021

1 Comment

 
Create fun and festive bird-feeder holiday ornaments with this week’s grab & go activity! Made with bird seed, gelatin, and hemp twine, these cute decorations can be put up outside to feed our feathered friends at a time when food sources for birds can be scarce.
Picture
Materials Included in your Kit
  • 1 Cup bird seed
  • 1 tablespoon unflavored gelatin*
  • Holiday cookie cutter
  • 1” piece of straw
  • Parchment paper
  • Twine*
Materials & Supplies from Home
  • Water
  • Stovetop or electric kettle
  • Spoon
  • Bowl
  • Cookie tray (optional)
  • Additional cookie cutters (optional)
The recipe below and ingredients included in your kit is enough to make 5-10 bird-seed ornaments. If you have cookie cutters at home you can use them to make the whole batch at once. If you are only making one ornament at a time, we recommend cutting the recipe in half.

*If you are making this activity with materials from home, please use twine made of 100% natural fibers (cotton, hemp, wool, etc.) that will biodegrade overtime if left outside. Please also make sure your gelatin is unflavored and contains no sugar. Artificial flavoring and sugar can be harmful to our native bird species.


  1. Lay out your parchment paper somewhere out of the way where your ornament can sit overnight to dry. Place your cookie cutter, edge down on top of the parchment paper.
  2. Using a stovetop or electric kettle, bring at least ¼ cup of water to a boil
  3. Add ¼ cup of boiling water to your bowl. Add 1 tablespoon of gelatin and stir until completely dissolved. Your mixture should start to feel pretty goopy!
  4. Add 1 cup of birdseed to your gelatin mixture. Stir until thoroughly combined.
  5. Carefully spoon your birdseed and gelatin mixture into your cookie cutter, making sure to pack the mixture down to fill the entire cookie cutter
  6. Push your piece of straw into the seed mixture in your cookie cutter wherever you would like to string it through for hanging.
  7. Let your cookie cutter and seed mixture sit undisturbed for several hours, ideally overnight. You could also set your parchment paper and birdseed ornament up on a cookie sheet to place in the fridge for faster drying times.
  8. When your birdseed ornament has dried, gently remove your plastic straw. Then gently push your birdseed ornament out of the cookie cutter.​
  9. Thread your twine through the birdseed ornament and tie a knot at the other end. Your birdseed ornament is ready to hang outside! Please hang your ornaments well away from windows to keep our feathered friends safe. ​

Adornos para comederos de pájaros ​  Proyecto de Arte para llevar a casa

Picture
Materiales incluidos en su kit
  • 1 taza de alpiste
  • 1 cucharada de gelatina sin sabor *
  • Cortador de galletas navideñas
  • 1 sorbete de plástico 
  • Papel pergamino
  • Hilo/cordel*
Materiales y suministros del hogar
  • Agua
  • Estufa o hervidor eléctrico
  • Cuchara
  • Tazón
  • Bandeja para galletas (opcional)
  • Cortadores de galletas adicionales (opcional
Los materiales incluidos en su kit son suficientes para hacer de 5 a 10 adornos para comederos de pájaros. Si tiene cortadores de galletas en casa, puede usarlos para hacer todo el lote de una vez. Si solo está haciendo un adorno a la vez, le recomendamos que reduzca la receta a la mitad.

*Si está realizando esta actividad con materiales de su casa, utilice un hilo/cordel 100% natural (algodón, cáñamo, lana, etc.) que se biodegradarán con el paso del tiempo si se dejan afuera. También asegúrese de que su gelatina no tenga sabor y no contenga azúcar. Los aromatizantes artificiales y el azúcar pueden ser perjudiciales para nuestras especies de aves nativas.
  1. Coloca el papel de pergamino en algún lugar fuera del camino donde tu adorno se pueda secar durante la noche. Coloque su cortador de galletas de la manera que el borde con filo quede en la base del papel pergamino.
  2. Usando una estufa o hervidor eléctrico, hierva al menos ¼ de taza de agua
  3. Agrega ¼ de taza de agua hirviendo a su tazón. Agrega 1 cucharada de gelatina y revuelva hasta que se disuelva por completo. ¡Tu mezcla debería comenzar a sentirse bastante pegajosa!
  4. Agrega 1 taza de alpiste a tu mezcla de gelatina. Revuelva hasta que esté bien combinado.
  5. Vierta con cuidado su mezcla de alpiste y gelatina en su cortador de galletas, asegurándose de esparcir la mezcla para llenar todo el cortador de galletas.
  6. Coloque firmemente el sorbete de plástico en la mezcla que está dentro de su cortador de galletas, en el lugar donde le gustaría pasarlo para colgarlo.
  7. Deje que su cortador de galletas y la mezcla  se asienten sin tocar durante varias horas, idealmente durante la noche. Otra manera consiste en colocar el papel  pergamino con la mezcla en una bandeja para hornear galletas y llevarlo al refrigerador para acortar el tiempo de secado..
  8. Cuando su adorno para comederos de pájaros se haya secado, retire suavemente el sorbete de plástico. Luego empuje suavemente su adorno para comederos de pájaros  fuera del cortador de galletas.​
  9. Pase el hilo/cordel por el adorno para comederos de pájaros  (donde estaba colocado el sorbete de plástico) y haz un nudo en el otro extremo. ¡Tu adorno para comederos de pájaros está listo para colgar afuera! Cuelgue sus adornos lejos de las ventanas para mantener a salvo a nuestros amigos emplumados.
1 Comment

    Adult News & reviews

    Library news, info about upcoming events, reviews of books and films, and a look at the topics that affect us as a library.

    Archives

    March 2023
    February 2023
    January 2023
    December 2022
    November 2022
    October 2022
    September 2022
    August 2022
    July 2022
    April 2022
    March 2022
    February 2022
    January 2022
    December 2021
    November 2021
    October 2021
    September 2021
    August 2021
    July 2021
    May 2021
    April 2021
    March 2021
    February 2021
    January 2021
    December 2020
    November 2020
    October 2020
    September 2020
    August 2020
    July 2020
    June 2020
    May 2020
    April 2020
    March 2020
    June 2019
    May 2019
    April 2019
    February 2019
    January 2019
    December 2018
    November 2018
    October 2018
    September 2018
    August 2018
    July 2018
    June 2018
    May 2018
    April 2018
    March 2018
    February 2018
    January 2018
    December 2017
    November 2017
    October 2017
    September 2017
    August 2017
    June 2017
    May 2017

    RSS Feed

Picture
​​Library Location
​
14 Midland Ave
Basalt, CO 81621
​970-927-4311
Library Hours
​Mon-Thur: 10AM - 7PM
Fri & Sat: 10AM - 5PM
​Sun: 12- 5PM
Let's Connect!

General

Jobs
​Remote/Wireless Printing
Service Pricing
Friends' Book Store
News & Reviews Blog
​Newsletter Signup
​Full Calendar

Borrowing

Get a Library Card
​Store your Library Card Digitally
​Checkout Times
Renew Materials Online
​Update Your Account
Comments & Suggestions

About 

Staff Directory
​Fine Free Information
Board, Committees, Minutes, and Reports
Financials & Budgets
​Policies & Bylaws
​
BRL District Map
Strategic Plan
  • Programs & Events
    • Full Calendar
    • Music at the Library
  • Our Services
    • Adult Library (Books, DVDs, CDs)
    • Teen & Young Adult Library
    • Children's Library >
      • Dolly Parton's Imagination Library
      • Children's Resources
    • Biblioteca Española
    • Digital Media Library
    • Library of Things
    • Online Resources & Research Databases
    • Technology Help
  • En Español
  • Library & Community
    • Meet, Study, Work
    • Community Resources
    • Job Seeker Information
  • Support
  • Online Catalog
    • Search Online Catalog
    • Account Login
    • Renew Materials Online