• Programs & Events
    • Full Calendar
    • Music at the Library
  • Our Services
    • Adult Library (Books, DVDs, CDs)
    • Teen & Young Adult Library
    • Children's Library >
      • Dolly Parton's Imagination Library
      • Children's Resources
    • Biblioteca Española
    • Digital Media Library
    • Library of Things
    • Online Resources & Research Databases
    • Technology Help
  • En Español
  • Library & Community
    • Meet, Study, Work
    • Community Resources
    • Job Seeker Information
  • Support
  • Online Catalog
    • Search Online Catalog
    • Account Login
    • Renew Materials Online
Basalt Regional Library
  • Programs & Events
    • Full Calendar
    • Music at the Library
  • Our Services
    • Adult Library (Books, DVDs, CDs)
    • Teen & Young Adult Library
    • Children's Library >
      • Dolly Parton's Imagination Library
      • Children's Resources
    • Biblioteca Española
    • Digital Media Library
    • Library of Things
    • Online Resources & Research Databases
    • Technology Help
  • En Español
  • Library & Community
    • Meet, Study, Work
    • Community Resources
    • Job Seeker Information
  • Support
  • Online Catalog
    • Search Online Catalog
    • Account Login
    • Renew Materials Online

Grab & Go Activity: DIY Popsicle Stick Catapults

11/27/2021

0 Comments

 
Experiment with popsicle sticks, plastic spoons, and rubber bands to create your own catapult!
Picture
Materials in your Grab & Go Kit:
  • 12 popsicle sticks
  • 3 rubber bands
  • One plastic spoon
  • 3 mini pom-poms (your ammo)
Materials from Home (Optional):
  • Hot glue
  • Bottle cap
  • Tape
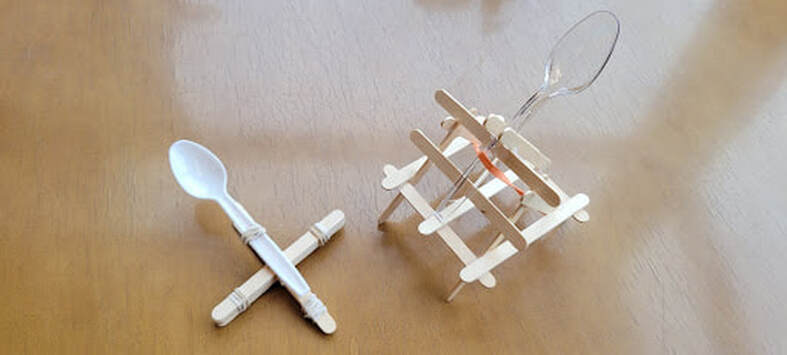
A catapult is a lever device designed to launch projectiles without the aid of propellants or fuel. Most catapults use tension energy that is gradually stored, and then released all at once to launch the projectile. A good example of this is a slingshot, which is actually a simple catapult! As the band of the slingshot is pulled back, the band is loaded with tension energy - the further you pull back, the more energy is stored in the band. When you let go, the band releases that energy all at once, snapping back into place and flinging your object away. In ancient times catapults were used in siege warfare, but are mainly used now for launching airplanes from aircraft carriers!

To build a simple popsicle stick catapult, watch this video from Youtube STEM and craft creator Denise Bertacchi. To get ideas for a more  complex design, check out this Accurate Catapult with Popsicle Sticks video from high school physics teacher and creator Raymond Burns. 

Once you understand the basics, experiment to create your own catapult design! What happens if you move the fulcrum - the supporting popsicle sticks underneath your plastic spoons? When you bend the spoon back you are applying force to the catapult.  The fulcrum is transferring the force from bending back the spoon to shooting your ammo.  What happens when the fulcrum is closer to the spoon head?  What happens when the fulcrum is farther from the spoon head?

To learn more about the history of catapults, check out this article from Britannica Library Young Adult. To learn about simple machines and the physics behind them, learn more at Britannica Library Children. To translate these pages into Spanish, click on the globe icon and select “Spanish” from the drop down menu.

Projecto de Arte para llevar a casa: Catapultas de palitos de helado

¡Experimente con palitos de helado, cucharas de plástico y gomas elásticas para crear su propia catapulta!
Materiales en su kit:
  • 12 palitos de helado
  • 3 bandas de goma
  • Una cuchara de plástico
  • 3 mini pompones (tu munición)
Materiales de casa (opcional):
  • Pegamento caliente (silicona)
  • Tapa de botella
  • Cinta
Una catapulta es un dispositivo de palanca diseñado para lanzar proyectiles sin la ayuda de propulsores o combustible. La mayoría de las catapultas usan energía de tensión que se almacena gradualmente y luego se libera de una vez para lanzar el proyectil. Un buen ejemplo de esto es una honda, que en realidad es una simple catapulta. A medida que la banda de la honda se tira hacia atrás, la banda se carga con energía de tensión: cuanto más se tira hacia atrás, más energía se almacena en la banda. Cuando lo sueltas, la banda libera esa energía de una vez, volviendo a su lugar y arrojando tu objeto. En la antigüedad, las catapultas se usaban en la guerra de asedio, ¡pero ahora se usan principalmente para lanzar aviones desde portaaviones!

Para construir una catapulta de palitos de helado simple, mira este video de Youtube STEM de la creadora de manualidades Denise Bertacchi. Para obtener ideas para un diseño más complejo, vea este video de Catapulta precisa con palitos de helado del maestro de física y creador de la escuela secundaria Raymond Burns.

Una vez que comprenda los conceptos básicos, ¡experimente para crear su propio diseño de catapulta! ¿Qué sucede si mueves el fulcro (punto de apoyo), los palitos de paleta de soporte debajo de tus cucharas de plástico? Cuando dobla la cuchara hacia atrás, está aplicando fuerza a la catapulta. El fulcro transfiere la fuerza de doblar la cuchara hacia atrás para disparar la munición. ¿Qué sucede cuando el fulcro está más cerca de la cabeza de la cuchara? ¿Qué sucede cuando el fulcro está más lejos de la cabeza de la cuchara?

Para obtener más información sobre la historia de las catapultas, consulte este artículo de Britannica Library Young Adult. Para aprender sobre máquinas simples y la física detrás de ellas, aprenda más en Britannica Library Children. Para traducir estas páginas al español, haga clic en el icono del globo terráqueo y seleccione "Español" en el menú desplegable.

0 Comments

Grab & Go Activity with The Art Base: Sew an Owl Softie

11/19/2021

0 Comments

 
Picture
Supplies Provided
  • Template for cutting owl parts (facial disks, beak, wings, stomach pattern)
  • Sewing needle
  • Embroidery sewing floss
  • Owl body cutout (2 sides)
  • 2 Buttons for eyes
  • 2 Small Buttons for eyes
  • Stuffing​​

​Supplies You Have at Home
  • Scissors
  • Fabric glue or hot glue (if you are not sewing)
  1. Remove all supplies from the bag and separate all items so you have them ready when you need them.
  2. Start by cutting an arm’s length of floss. Thread your needle with the colored embroidery floss. You might want to ask an adult to help you with this part. Tie a knot in the end of the thread to stop it from slipping through. Set aside.
  3. Now you will need to use the body parts template to cut out the wings, body, facial disks, and beak).
  4. Take one of the large owl body cutouts and arrange the body part pieces how you’d like them to be sewn onto the owl. It is important to pre-plan before you start sewing.
  5. One by one, start attaching the pieces by sewing them onto your owl. Visual stitching will add character to your owl with a whip stitch. This is a simple diagonal stitch.
  6. Poke your needle up through both layers of fabric ending on the top layer. Circle the needle around the additional body part to the bottom layer of fabric and poke up through the fabric by moving the needle just next to the previous stitch. Repeat this step until the entire piece is attached. End your stitch under the body and tie two knots in the end. Cut the remaining thread.
  7. Sew the rest of the body parts on by using this same stitch.
  8. You can choose to sew the buttons onto the owl or use hot glue if you have that available.
  9. Now you are ready to sew the back of the owl to the front! Do this by using the same whip stitch. When you get close to the end, leave about 1-2 inches to stuff the owl with the bag of white pillow stuffing to your desired fullness.
  10. Finish your owl by completing the whipstitch. For the finishing stitch, poke your needle up through the bottom and top one last time. Circle around the owl and finish by going up through that same last hole and tie a double knot around the thread. Cut your remaining thread and stuff the end-tail into the owl.
 
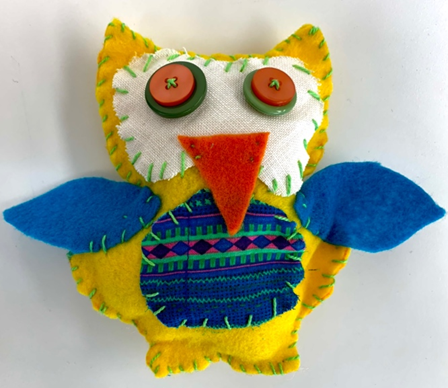
Take pictures and email to info@theartbase.org or Kristen Doyle, kdoyle@basaltlibrary.org.

Cose un búho de peluche

Suministros proporcionados
  • Plantilla para cortar las partes del búho (discos faciales, pico, alas, patrón de estómago)
  • Aguja para coser
  • Hilo de bordado
  • Recorte del cuerpo del búho (2 lados)
  • 2 botones para ojos
  • 2 Botones pequeños para ojos
  • Relleno
Suministros que tienes en casa
  • Tijeras
  • Pegamento para tela o pegamento termofusible (si no está cosiendo)
  1. Saca  todos los suministros de la bolsa y separa todos los artículos para tenerlos listos cuando los necesite.
  2. Empieza cortando el hilo de bordado. Enhebra tu aguja con el hilo de bordar de colores. Quizás puedes pedirle a un adulto que te ayude con esta parte. Haz un nudo en el extremo del hilo para evitar que se deslice. Dejalo de lado por ahora.
  3. Ahora necesitarás usar la plantilla de las partes del cuerpo para cortar las alas, el cuerpo, los discos faciales y el pico.
  4. Toma uno de los grandes recortes del cuerpo del búho y coloca las piezas de las partes del cuerpo como te gustaría coser al búho. Es importante planificar antes de comenzar a coser.
  5.  Una por una, comienza a sujetar las piezas cosiendolas a tu búho. Costuras visibles agregarán carácter a su búho con una puntada llamada “whip stitch”. Esta es una puntada diagonal simple.
  6. Inserte la aguja a través de las dos capas de tela que terminan en la capa superior. Circula la aguja alrededor de las partes adicionales, a la parte inferior de la tela e inserta a través de la tela  moviendo la aguja enseguida de la puntada anterior. Repite este paso hasta que la pieza esté sujeta. Termina tu puntada abajo del cuerpo y haz dos nudos al final del hilo. Corta el hilo restante.
  7. Cosé el resto de las partes del cuerpo usando la misma puntada.
  8. Puedes coser los botones al búho o usar pegamento termofusible si lo tienes disponible.
  9. ¡Ahora estás listo para coser el lomo de la lechuza a la parte de frente! Haz esto usando la misma puntada “whip stitch”. Cuando te acerques al final, deje aproximadamente 1-2 pulgadas para rellenar el búho con la bolsa de relleno de almohada blanca hasta la plenitud deseada.
  10. Termina tu búho completando el “whip stitch”. Para la puntada final, introduce la aguja por la parte inferior y superior por última vez. Haz un círculo, insertando la aguja en círculo y haciendo un nudo doble alrededor del hilo. Corta el hilo restante y mete la cola en el búho.

Tome fotografías y envíelas por correo electrónico a info@theartbase.org o Kristen Doyle, kdoyle@basaltlibrary.org.
0 Comments

Grab & Go Activities: CreativeBug Friendship Bracelets

11/19/2021

0 Comments

 
Learn how to create a variety of fun friendship bracelets with this tutorial from CreativeBug! CreativeBug hosts a variety of arts and crafts video classes, and can be accessed for FREE with your library card. Follow the steps below to access Twinkie Chan’s Make Friendship Bracelets class.
Materials
Included in your Grab & Go Kit:
  • Several colors of embroidery floss
  • One safety pin
  • Several fun beads
  • 1 button
  • Graph Paper
From Home
  • Scissors
  • A pencil
  • Optional: clipboard, tape, a needle, a toothpick, fabric glue (for “fancy” bracelet closure
Instructions
  1. Visit www.creativebug.com/lib/basaltlibrary
  2. Log in using your library card number, the 14 digit number found on the back of your card.
    If you have a library account with us but have lost your card, we can tell you your card number or create a new one for you over the phone or at our patron services desk. We will ask to see your photo ID or have you answer a question to verify access to your account.
  3. Once you have logged in, access the friendship bracelet tutorial at www.creativebug.com/classseries/single/make-friendship-bracelets or by typing “Make Friendship Bracelets” into the classes search bar.​
  4. Click on the “chapters” button below the video screen to start the video tutorial! If you’re new to creating friendship bracelets, create a twist style bracelet. If you’re looking for more of a challenge, you can watch the whole class and learn how to create friendship bracelets with letters and words woven into them!

Projecto de Arte para llevar a casa: CreativeBug Pulseras de hilo encerado de la Amistad

¡Aprende a crear pulseras de hilo encerado de la amistad con este tutorial. Tutoriales Belen es un canal conocido de YouTube en español que publica nuevos videos de manualidades cada semana. Con los materiales incluidos en su kit para llevar y algunos artículos de su casa, puede aprender a crear pulseras de hilo encerado de colores, viendo los tutoriales disponibles en el enlace a continuación.
Materiales
Incluido en su kit Grab & Go
  • Varios colores de hilo de bordar
  • Un imperdible
  • Un paquete de lindas cuentas
  • 1 botón
  • Papel cuadriculado
Desde casa
  • Tijeras
  • Un lápiz
  • Opcional: portapapeles, cinta adhesiva, una aguja, un palito de diente, pegamento para tela (para usar al final y que la pulsera quede "elegante”
Instructions
  1. Videos de Haz Pulseras de Hilo Encerado/Macrame​
  2. Si nunca antes ha hecho pulseras de la amistad, le recomendamos que comience con las "DIY Friendship Bracelets For Beginners - 5 EASY IDEAS" (no se preocupe, las instrucciones están en español). Si buscas hacer algo más complejo, prueba algunos de los patrones de pulseras que se muestran en el video “20 Ideas Para Hacer Pulseras De Hilo” 
0 Comments

    Adult News & reviews

    Library news, info about upcoming events, reviews of books and films, and a look at the topics that affect us as a library.

    Archives

    March 2023
    February 2023
    January 2023
    December 2022
    November 2022
    October 2022
    September 2022
    August 2022
    July 2022
    April 2022
    March 2022
    February 2022
    January 2022
    December 2021
    November 2021
    October 2021
    September 2021
    August 2021
    July 2021
    May 2021
    April 2021
    March 2021
    February 2021
    January 2021
    December 2020
    November 2020
    October 2020
    September 2020
    August 2020
    July 2020
    June 2020
    May 2020
    April 2020
    March 2020
    June 2019
    May 2019
    April 2019
    February 2019
    January 2019
    December 2018
    November 2018
    October 2018
    September 2018
    August 2018
    July 2018
    June 2018
    May 2018
    April 2018
    March 2018
    February 2018
    January 2018
    December 2017
    November 2017
    October 2017
    September 2017
    August 2017
    June 2017
    May 2017

    RSS Feed

Picture
​​Library Location
​
14 Midland Ave
Basalt, CO 81621
​970-927-4311
Library Hours
​Mon-Thur: 10AM - 7PM
Fri & Sat: 10AM - 5PM
​Sun: 12- 5PM
Let's Connect!

General

Jobs
​Remote/Wireless Printing
Service Pricing
Friends' Book Store
News & Reviews Blog
​Newsletter Signup
​Full Calendar

Borrowing

Get a Library Card
​Store your Library Card Digitally
​Checkout Times
Renew Materials Online
​Update Your Account
Comments & Suggestions

About 

Staff Directory
​Fine Free Information
Board, Committees, Minutes, and Reports
Financials & Budgets
​Policies & Bylaws
​
BRL District Map
Strategic Plan
  • Programs & Events
    • Full Calendar
    • Music at the Library
  • Our Services
    • Adult Library (Books, DVDs, CDs)
    • Teen & Young Adult Library
    • Children's Library >
      • Dolly Parton's Imagination Library
      • Children's Resources
    • Biblioteca Española
    • Digital Media Library
    • Library of Things
    • Online Resources & Research Databases
    • Technology Help
  • En Español
  • Library & Community
    • Meet, Study, Work
    • Community Resources
    • Job Seeker Information
  • Support
  • Online Catalog
    • Search Online Catalog
    • Account Login
    • Renew Materials Online